Mautic
Cronfig plugin supports both Mautic 2 and Mautic 3.
Installation
Place the files of the plugin into your Mautic
There are 2 ways to get the Mautic-Cronfig plugin to your Mautic. If you have SSH access to your server or if you have only SFTP access. Follow the steps based on what you have.
I have SSH access
- Log in with
ssh user@host - Go to your Mautic root folder and then to the plugins folder.
cd /path_to_mautic/plugins - Download and unzip with
curl https://github.com/cronfig/mautic-cronfig/archive/master.zip -o cronfig.zip -L && unzip cronfig.zip && mv mautic-cronfig-master CronfigBundle - Clear Mautic's cache. Simply delete the content of
app/cache/prodfolder.rm -rf ../app/cache/prod/*
I have only SFTP access
- Download the plugin to your computer.
- Unzip the downloaded package.
- Upload the unzipped folder to the plugins folder.
- Rename it to CronfigBundle the way so you could locate CronfigBundle.php file on this path:
plugins/CronfigBundle/CronfigBundle.php. - Clear Mautic's cache. Simply delete the content of
app/cache/prodfolder.
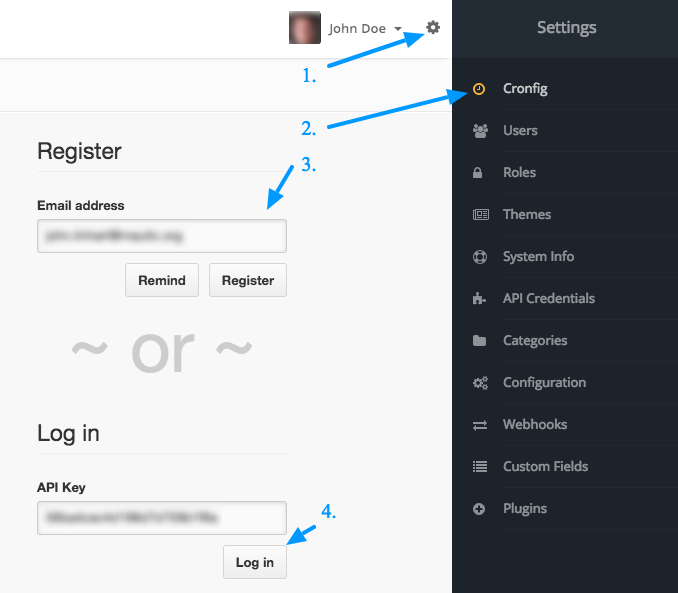
Enable Cronfig Plugin in Mautic
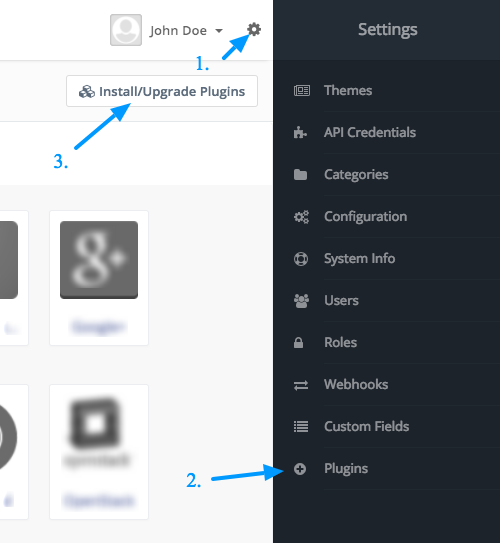
- Go to the right hand side Mautic menu (click the cog icon in the top right corner to slide the menu out) and go to Plugins.
- Click the Install/Upgrade Plugins button. The Cronfig icon should appear in the list of plugins.
- Go to the right hand side Mautic menu again. A new menu item called Cronfig should be there. Hit it. A register/login screen should appear.
- Your email should be prefilled. Click on the Register button and check your email inbox. Your API key should appear in your inbox any second.
- If you received the Cronfig registration email, copy the API key from it, insert it to the Log in input and log in.